
Locating your EFI chip!
About a couple of months ago I got a lot of three laptops on OfferUp. They were two 2011 MacBook Pros and a Dell Latitude something. I sold the Dell Latitude for around 250 bucks! But the MacBook's on the other hand, they both had a EFI lock and a Activation Lock (example seen below). I spent some time researching and getting really no where, cause I didn't know where to look. Later on, I found out about EFI chips and how they get flashed, and I managed to unlock both MacBooks! And now, I'm here to share what I've come across in a hopefully helpful guide!
I know there's multiple guides covering flashing a EFI chip and all, but they cover a spefici model of MacBooks in general, either a < 2012 macbook, or some other newer macbook. My goal here to to gather all the infornmation I've found and tell what way is the easiest to do for your MacBook.
(a youtube video may be coming out, so maybe check that out when it releases for a more visual guide)
On Apple's own community forums, contributors state that you'll need to schedule an in-person service appointment with an Apple Store or Apple Authorized Service Provider, bringing your Mac to the appointment, and a original receipt or invoice as proof of purchase. They would take your Mac and use their own backdoor to unlock it, usually enforced by their own private keys that hasn't been released to the public (there has been leaks im pretty sure, but i've been unable to confirm its legitamatcy, look up SCBO keys if you'll like). But it's pretty straight forward to unlock it hardware-wise, only a couple bytes on a chip hold the EFI lock, which is what we'll be doing in this guide.
A simple rundown on WHAT a EFI chip (realitve to a Mac) actually is;
- Controls and holds nessacry boot data
- Performs the Power-On-Self-Test (POST) for the MacBook.
- Holds EFI locks and Activation Locks
- Controls boot loading Having a corrupted or no EFI chip results in the Mac (really any computer with a bios chip) being a dead brick.
Important infornmation;
This guide will allow you to:
- Remove a EFI lock (clearing NVRAM)
- Remove pincodes (clearing NVRAM as well)
- Change serial numbers
- Clean Intel ME region
- Fix corrupted EFI's
CH341A programmers will be used in this guide, and almost ALL black pcb CH341A programmers mistakenly outputs 5V on data rails; this could result in your chip damaging itself with each write (doesn't really hurt much for a one job personally, but safety first, unless your chip is 1.6v >: ). But there is a solution to fix this problem on these CH341A programmers; Referring to Sawyer Shepherd's Blog, you can actually do a simple fix to these CH341A programmers. I won't go in depth here, but you can buy a cheap CH341A programmer from Amazon, cut a trace, use a jumper between two pins, and voila! But you can always just buy a green CH341A programmer instead.
Below you can find a "at a glace" guide to identify what you'll need.
(you can go on EveryMac's Ultimate Mac Lookup to lookup your MacBook. shout out to them!!!)
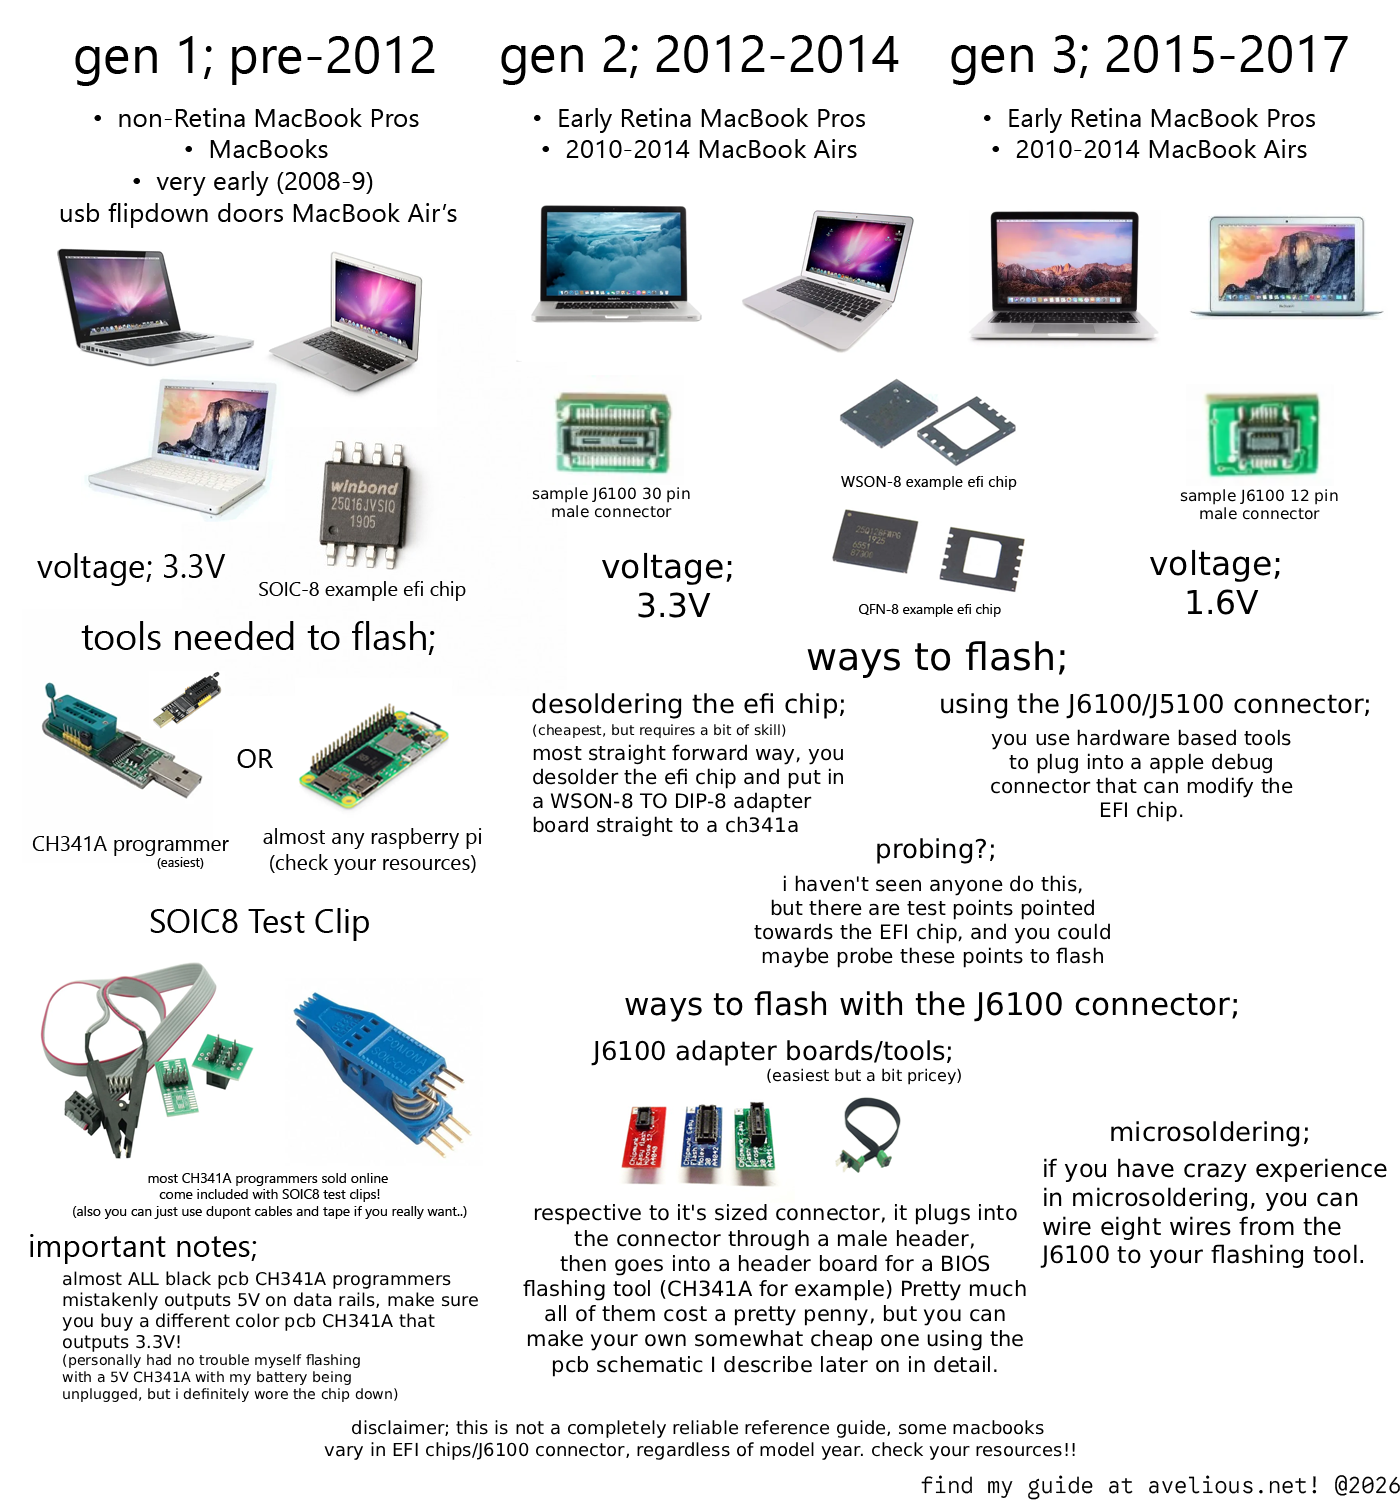
Once you found your MacBook and seen if its compatiable, click the link below to find where your EFI chip is located at;
I'll be dividing each guide with each generation, they will all lead to the point of when using a computer to start flashing. Find your MacBook's generation guide below!
Generation One;
This consists of the first batch of MacBooks made, noted as pre-2012.
This includes MacBooks such as;
- non-Retina MacBook Pros
- Oringal MacBooks
- very early 2008-2009 MacBook Airs (ones with usb flipdown doors)
These MacBooks contain a EFI chip known as a SOCI-8 chip, a standard in computer bios's. These are the easiest to unlock/flash fornunatly!
You can flash with either tool;
- CH341A programmer
- Raspberry Pi
I'll be going over the CH341A programmer method, as it's the easiest, and i've actually done it a couple of times. You can check out willzhang05's guide for an Raspberry Pi on Github though!
You're also going to need a SOCI8 test clip, for easy clipping onto the chip for programming. Most CH341A kits include a clip, so you'll be good and set!
Now enough talk, let's get started-
Setting up your CH341A programmer;
Let's start off with identifying the CH341A below,
We'll be using the 25 SPI series slot at the top of the CH341A'S bracket. Make sure your level is pointed up before continuing!
Now looking at your SOCI8 to DIP breakout board (seen below), take note of the numbers beside the pins, only pin number one is really worth remembering right now.
Onto the SOCI8 test clip, you'll be able to see a little red wire routing all the way up to the clip, that's pin one, see the vision? Pin one goes into pin one that goes into pin one, this will insure correct oritenation when connecting everything together!
Now we can start assembling the tool!;
Start by taking your SOCI8 test clip and inserting it into your SOCI8 to DIP breakout board, while accounting for pin one.
Then take that finshed product and position it seen in the picture below, make sure pin one is on the side of the level!
After that, stick them together, and press down on the breakout board while pulling the level down. If done correctly, the board should stay rigid and stiff!
Preparing the MacBook;