
Removing a 2006-2017 Macbook's EFI Lock/Pincode.
About a couple of months ago I got a lot of three laptops on OfferUp. They were two 2011 MacBook Pros and a Dell Latitude something. I sold the Dell Latitude for around 250 bucks! But the MacBook's on the other hand, they both had a EFI lock and a Activation Lock (example seen below). I spent some time researching and getting really no where, cause I didn't know where to look. Later on, I found out about EFI chips and how they get flashed, and I managed to unlock both MacBooks! And now, I'm here to share what I've come across in a hopefully helpful guide!
I know there's multiple guides covering flashing a EFI chip and all, but they cover a spefici model of MacBooks in general, either a < 2012 macbook, or some other newer macbook. My goal here to to gather all the infornmation I've found and tell what way is the easiest to do for your MacBook.
(a youtube video may be coming out, so maybe check that out when it releases for a more visual guide)
On Apple's own community forums, contributors state that you'll need to schedule an in-person service appointment with an Apple Store or Apple Authorized Service Provider, bringing your Mac to the appointment, and a original receipt or invoice as proof of purchase. They would take your Mac and use their own backdoor to unlock it, usually enforced by their own private keys that hasn't been released to the public (there has been leaks im pretty sure, but i've been unable to confirm its legitamatcy, look up SCBO keys if you'll like). But it's pretty straight forward to unlock it hardware-wise, only a couple bytes on a chip hold the EFI lock, which is what we'll be doing in this guide.
I do recommend reading the guide first before actually taking action on your Mac!
A simple rundown on WHAT a EFI chip (realitve to a Mac) actually is;
- Controls and holds nessacry boot data
- Performs the Power-On-Self-Test (POST) for the MacBook.
- Holds EFI locks and Activation Locks
- Controls boot loading
Having a corrupted or no EFI chip results in the Mac (really any computer with a bios chip) being a dead brick.
Important infornmation;
This guide will allow you to:
- Remove a EFI lock (clearing NVRAM)
- Remove pincodes (clearing NVRAM as well)
- Change serial numbers
- Clean Intel ME region
- Fix corrupted EFI's
This guide will likely work with other Mac devices from 2008–2017 as well! However, I won't be covering Mac's other than MacBooks in this guide.
CH341A programmers will be used in this guide, and almost ALL black pcb CH341A programmers mistakenly outputs 5V on data rails; this could result in your chip damaging itself with each write (doesn't really hurt much for a one job personally, but safety first, unless your chip is 1.6v). But there is a solution to fix this problem on these CH341A programmers; Referring to Sawyer Shepherd's Blog, you can actually do a simple fix to these CH341A programmers. I won't go in depth here, but you can buy a cheap CH341A programmer from Amazon, cut a trace, use a jumper between two pins, and voila! But you can always just buy a green CH341A programmer instead. You can always buy a more quality EEPROM flasher tool, cause an CH341A is a pretty budget flasher, and "could" cause problems if you do some steps wrong or what not. But here's a difference between a old and a new black CH341A (5v mistake vs fixed 3.3v)
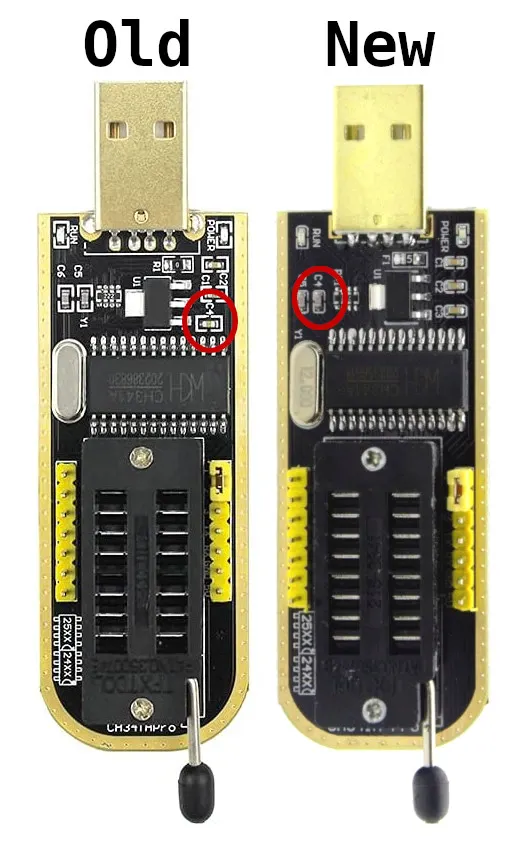
credit to Sawyer Shepherd's Blog again !
Below you can find a "at a glace" guide to identify what you'll need.
(you can go on EveryMac's Ultimate Mac Lookup to lookup your MacBook. shout out to them!!!)
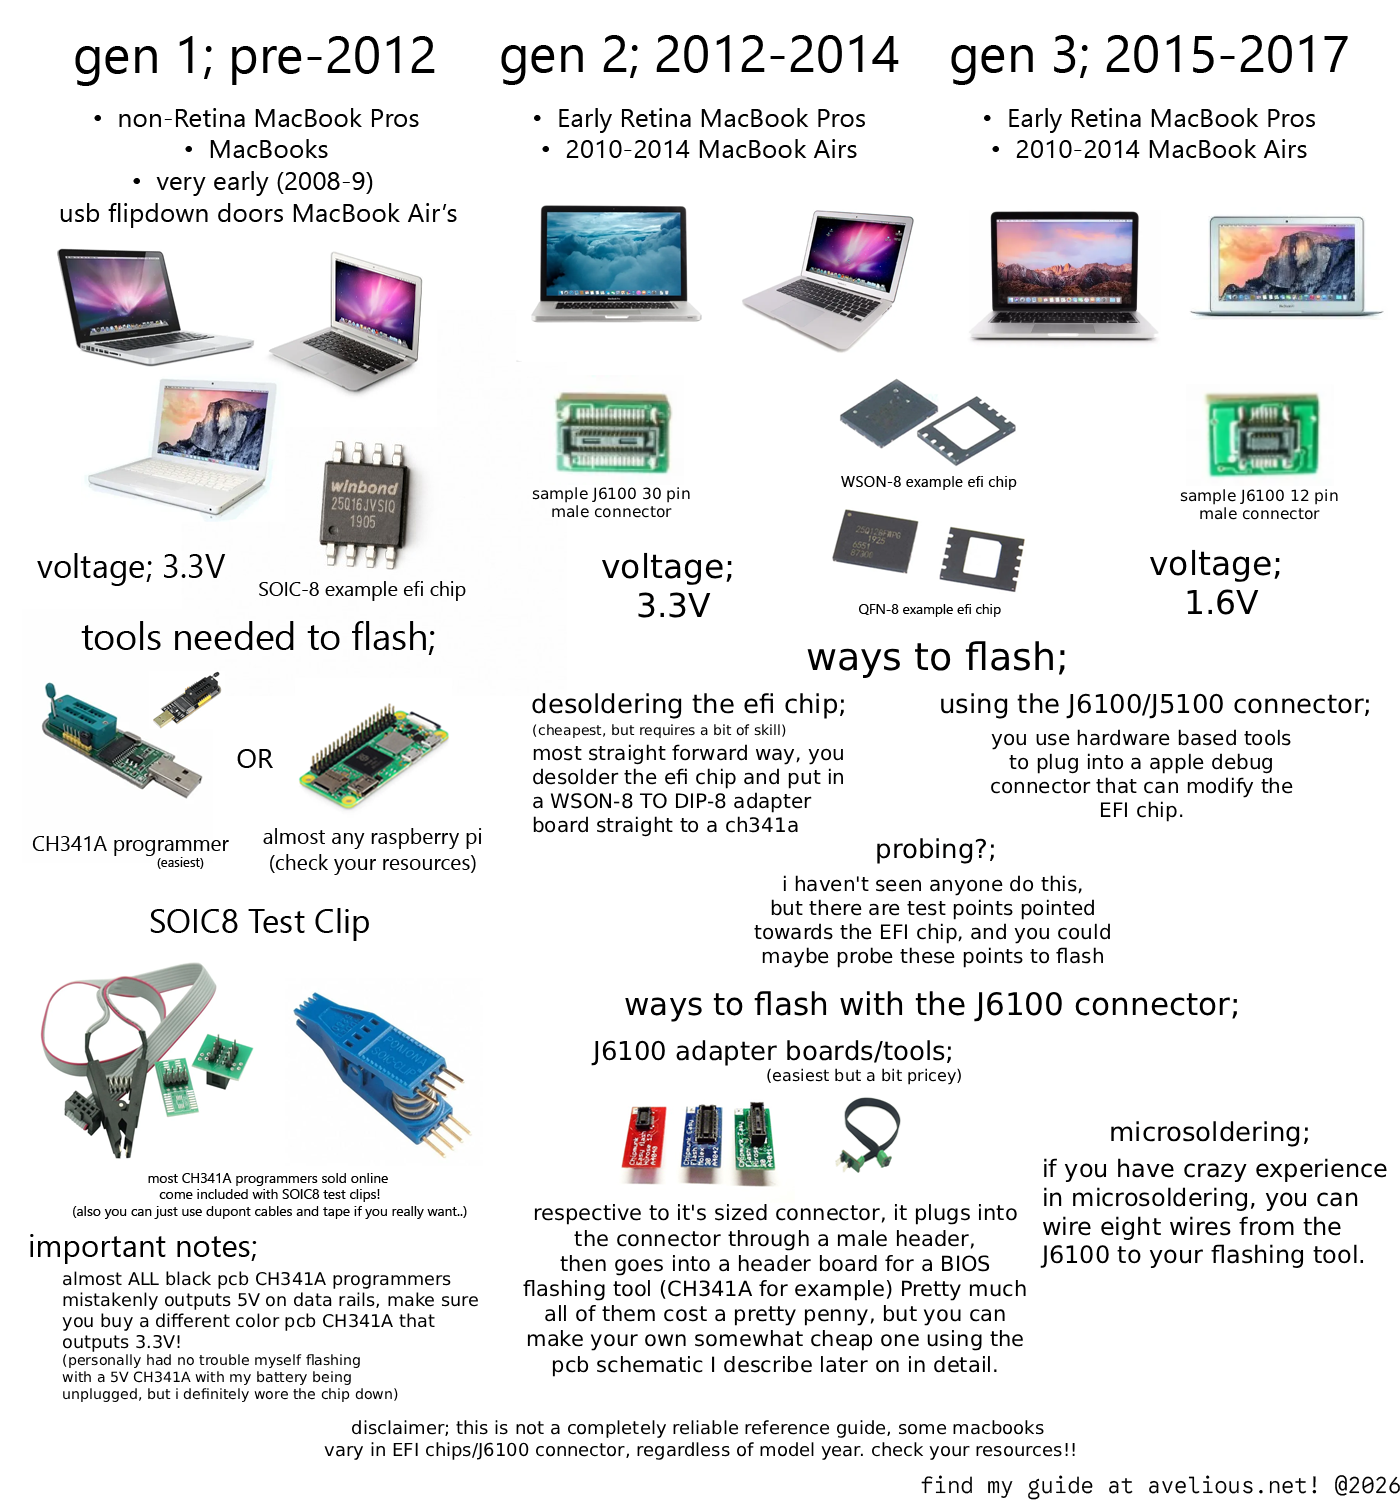
Once you found your MacBook and seen if its compatiable, click the link below to find where your EFI chip is located at on your logic board;
Generation One is the only generation with a included guide. Generations Two & Three provide more context on different flashing methods. However, all three will lead into the Software Flashing section below, which you can reference afterward!
Software Flashing;
By the time you reach this section of the guide, you should already have your EFI chip connected to your EEPROM flasher using a SOIC-8 clip or breakout board. If you've got that set up already, congrats!!!!
Needed applications;
These applications are designed to run with Windows. For my Linux users, you can use Wine to run Mac EFI Toolkit, and use flashrom, which already includes drivers and a tool to flash the EFI chip. For Mac users, use IMSProg (you have to compile it yourself), and use Wine for Mac EFI Toolkit. Or just use whatever, it's your choice!
I'll be using Windows for this guide, as I really cannot cover Linux or Mac.
First, download your drivers! Unpack CH341PAR.zip and open the SETUP.exe file inside of the CH341PAR folder
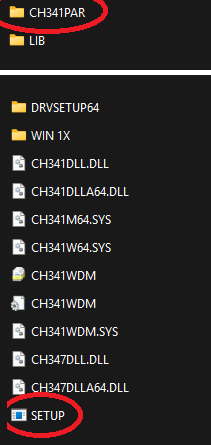
Allow elevated permissions (its not a virus please dont attack me), and click the install button.
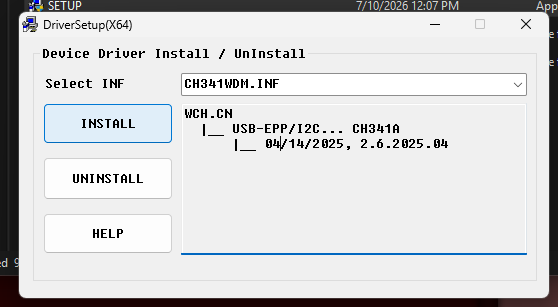
It should complete successfully with a message, and then you can delete the folder.
Moving onto CH341A Programmer by Shichang Zhuo, it should just open upon unpacking and running.
Plug in your CH341A, and it should say "CH341A Connected" at the bottom right corner.
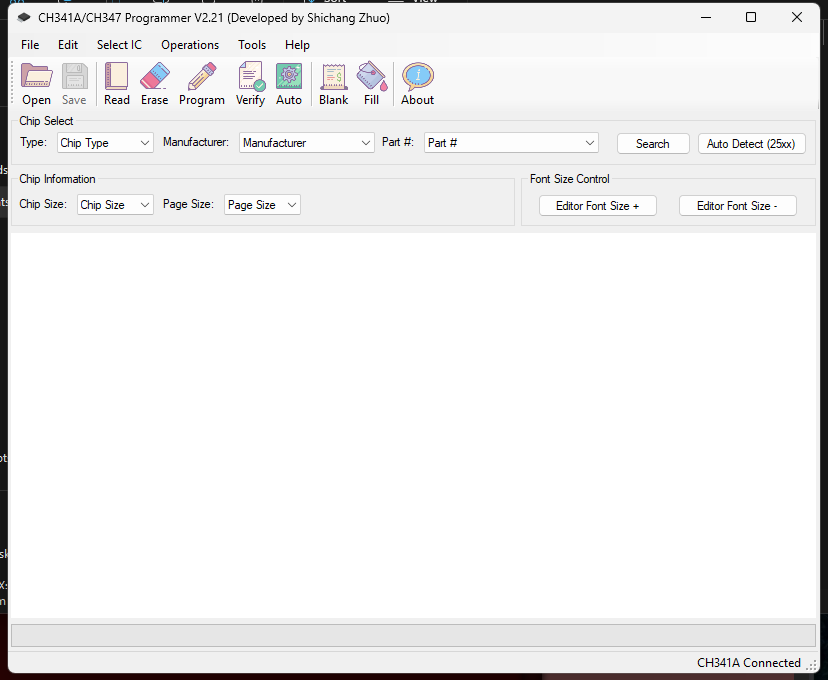
Now onto the fun part, click on the Auto-Detect button in the Chip Select section. It should automatically pop up with your EFI chip model!
If nothing happens when you click Auto-Detect, unplug your CH341A and reseat every connector, after that, try again.
If it still doesn't pop up, enter in your EFI chip model manually using info that is printed on your chip.
After you have your EFI chip model on the application, click Read on the top menu bar and stand by!

When completed, it should show a success message, and the hex dump should be unique! If it's all "FF", then it failed to read and you'll have to retry, or reseat some connectors (trust me most of the time its loose connections).
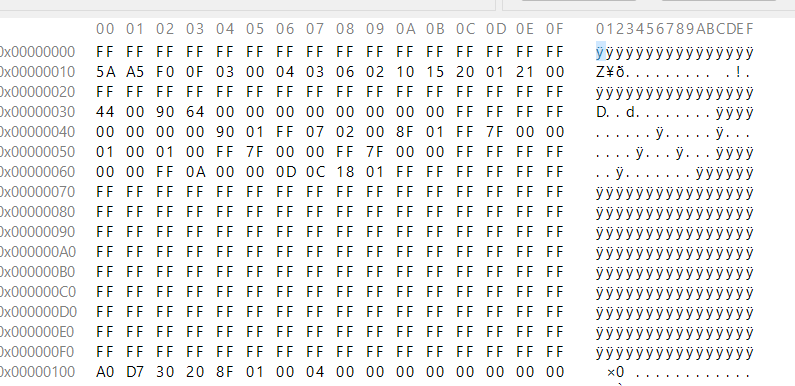
Now, we're going to back up the orginal EFI chip's firmware! Click on Save on the top menu bar, and select a safe destination to save it at. It should save as a .bin

(it's blanked out for me cause i didn't read anything because my test clip broke somehow :< )
Close out your CH341A Programmer after this, as it'll interfere with the next steps shown soon. We'll come right back though!
Now let's transition to Mac EFI Toolkit! Open it up and you should be greeted by this screen;
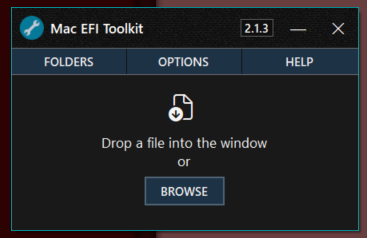
I'll be using a 2014 13' Macbook Pro EFI dump for this, it should be no different from other models in this guide;
Click browse and open up your EFI dump, and you should be greeted with this screen!
As you can see my EFI is locked, and it requires assistance!
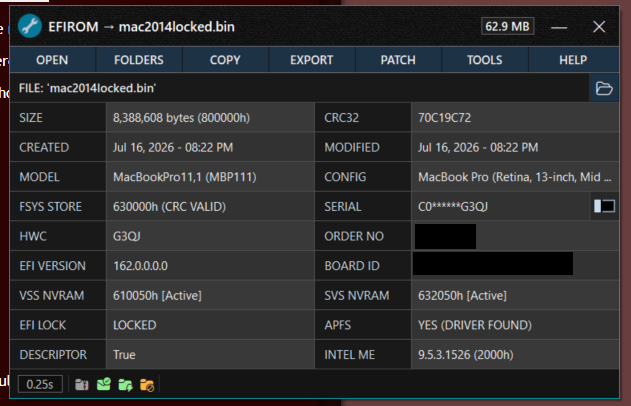
Head on over to the Patch dropdown menu and click on Disable EFI Lock.
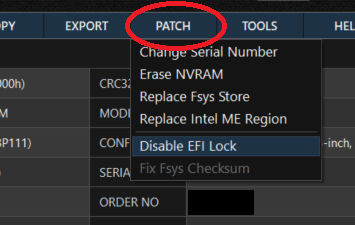
It'll show up with a prompt asking where you'll like to save the output, save it preferably in the same folder as the old EFI dump.
Then it'll should save successfully, and when asked loading the new file, click yes (only one more thing dont worry).
Now we're back on the same screen as before, but now it says EFI Lock - Unlocked!
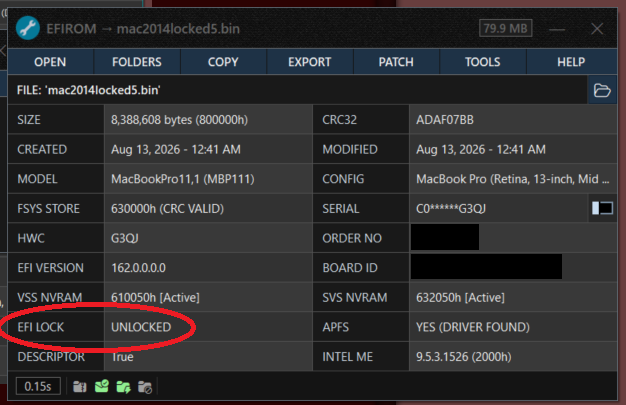
But we have to do one more thing, to make sure the Mac forgets the lock;
Head on back to the Patch dropdown menu, and click Clear NVRAM.
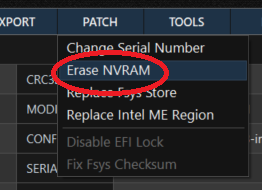
This will reset the Mac's startup disk selection, display resolution, time zone, etc; And it'll force the Mac to rebuild them from scratch, erasing previous pincodes and such. This won't hurt your personal data!
Only erase VSS and NOT SVS!
After that, it'll ask you again where to save the output, then asks if you want to load the new file, click yes again.
And you have now reset your MacBook's EFI chip, erasing all passwords and pins locked on it!
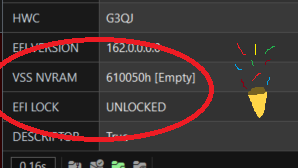
You can now close out of Mac EFI Toolkit, and head on over back to CH341A Programmer;
If you have unplugged your CH341A, replug it back in, ya gonna need it!
Now, before you click anything, MAKE sure you have your orginal EFI dump saved on your computer; Mainly just because if anything goes wrong you can always rewrite back to the past!
Moving forward, if you have confirmed that you have indeed backed up your orignal EFI dump, then click Erase in the top menu bar, and let it do its thing.
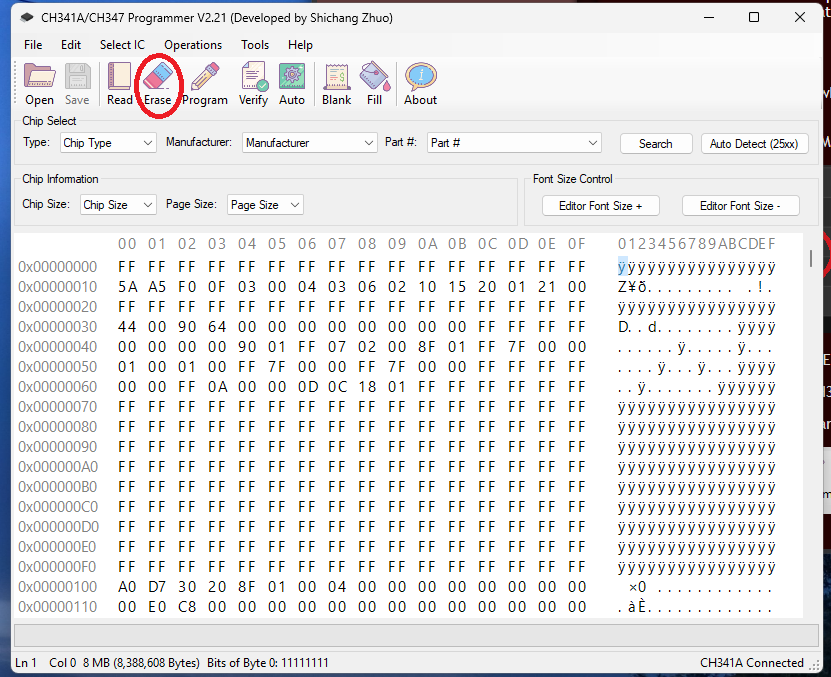
We're erasing all contents of the EFI chip to allow the new unlocked EFI dump to come in.
It should then prompt you with a success message, click off it, and click Blank in the top menu bar.

This just makes sure that the EFI chip is completely blank!
Again it'll prompt you with a success message
Click Open in the top menu bar and select your new unlocked EFI dump;

Then click Program in the top menu bar;

This will start flashing the new EFI dump onto the empty EFI chip.
Wait for it to complete, then click Verify to compare bytes between your EFI dump on your computer verus the newly flashed one on the EFI chip!

If it fails, retry erasing, blank checking, and reprogramming.
When it prompts you with a success message, you've finally unlocked your Mac!
You can now unplug your CH341A, and remove the connection between your EFI chip (SOCI-8 clip, soldered, etc)!
And there we go, you completed the guide!
I really hope this did help you in any sort of way, feel free to contact me at mandarinorange@avelious.net if you have any questions or issues with infornmation here!
Feel free to buy me a coffee here! (please im really broke)